Introduction to Growing Onions in Raised Garden Beds

Plant onions in raised garden beds offers numerous advantages, making it an excellent option for beginners. Raised beds provide improved soil drainage, which prevents the bulbs from sitting in overly wet conditions—a common cause of rot. You can easily control soil quality, ensuring your onions receive the right nutrients. They also allow you to regulate pH levels, as onions prefer slightly acidic to neutral soil (6.0–7.0 pH). The elevated setup minimizes weed competition and protects plants from certain pests. Raised beds warm up faster in spring, giving your onions a head start. They’re ideal for maximizing space and improving yield.
Benefits of Planting Onions in Raised Beds
When you plant onions in raised beds, you can control the soil conditions effectively. Raised beds allow for better drainage, preventing issues like waterlogging that can stunt onion growth. They make it easier to maintain nutrient-rich soil since you can customize what you add. You’ll notice fewer weeds because the defined space of raised beds limits weed intrusion. Raised beds warm up faster in spring, giving your onions an earlier start and potentially extending their growing season. Additionally, their ergonomic design reduces strain, making planting and harvesting more accessible for you. This setup is ideal for improving yields and overall plant health.
Selecting the Right Onion Varieties for Your Climate
To maximize success in your raised garden bed, you need to choose onion varieties suited for your specific climate. Onions are photoperiod-sensitive, meaning they depend on day length for bulb formation.

- Short-day onions are ideal if you live in southern regions with mild winters. These varieties require 10-12 hours of daylight and are often planted in fall for a spring harvest.
- Intermediate-day onions are best in areas with moderate climates. They need 12-14 hours of daylight and adapt to a wider temperature range.
- Long-day onions thrive in northern regions. They need 14-16 hours of daylight and are ideal for planting in early spring for summer harvests.
Choose wisely to match your location’s conditions.
Choosing the Best Location for Your Raised Onion Bed
When selecting a spot for your raised onion bed, prioritize areas that receive plenty of sunlight at least six to eight hours of direct sun daily. Onions thrive in full sun, so avoid shaded spots near trees or large structures. Ensure the area has good drainage to prevent waterlogging, which can cause rot.
Check the soil below your raised bed. It should drain well but retain some moisture. Pick a location away from strong winds to keep your onions upright. Finally, consider proximity to a water source for easy irrigation and choose a spot convenient to access for weeding and harvesting.
Preparing the Soil: The Key to Healthy Onion Growth

To start, choose a location with well-draining soil and full sunlight for optimal onion growth. Raised garden beds ensure good drainage, but soil preparation remains vital. Begin by loosening the soil with a garden fork to break up any compacted areas. Onions thrive in slightly acidic to neutral soil, so test the pH and aim for a range between 6.0 and 7.0. Mix in compost or organic matter to enrich the soil with nutrients and improve moisture retention. Avoid heavy clay soil by amending it with sand or aged manure. Ensure the bed is weed-free to reduce competition for nutrients and water.
How to Build and Set Up Your Raised Garden Bed

To start, choose a sunny spot where your onions will receive at least six hours of direct sunlight daily. Build the raised garden bed using untreated wood, recycled materials, or pre-made kits, ensuring it’s at least 6–12 inches deep for proper root growth. Line the base with landscaping fabric to prevent weeds from infiltrating.
Fill the bed with nutrient-rich soil mixed with compost to promote healthy onion growth. Test the soil pH to ensure it’s between 6.0 and 6.8, ideal for onions. Finally, water the soil evenly and let it settle for a day before planting your onion seeds or sets.
Planting Onions: Seeds, Sets, or Transplants
When planting onions in raised beds, you have three main options: seeds, sets, or transplants.
- Seeds: These are the most budget-friendly choice. Starting onions from seeds allows you to choose from a wide variety of types, but they require early planting indoors and more time to mature.
- Sets: Onion sets are essentially small, immature onion bulbs. They’re easy to plant and mature faster than seeds, making them ideal for beginners.
- Transplants: These are young onion plants that have already started growing. They’re convenient and typically provide reliable results with quicker harvests.

Choose based on your time, climate, and gardening experience level.
Watering and Fertilizing Tips for Onions
Watering: Onions need consistent moisture, but avoid overwatering. Water your raised garden bed 1–2 inches per week, depending on rainfall. Always check the soil; it should feel damp about an inch below the surface but not soggy. Improper drainage can cause root rot.
Mulch for Moisture: Apply a layer of mulch around your onion plants to retain moisture, reduce weeds, and regulate soil temperature.
Fertilizing: Use a nitrogen-rich fertilizer during the early growth phase, applying it every 2–3 weeks. Once bulbs start forming, switch to a balanced fertilizer with lower nitrogen to prioritize bulb development.
Avoid Over-Fertilizing: Over-fertilization can lead to excessive foliage growth at the expense of bulb size. Follow product instructions meticulously.
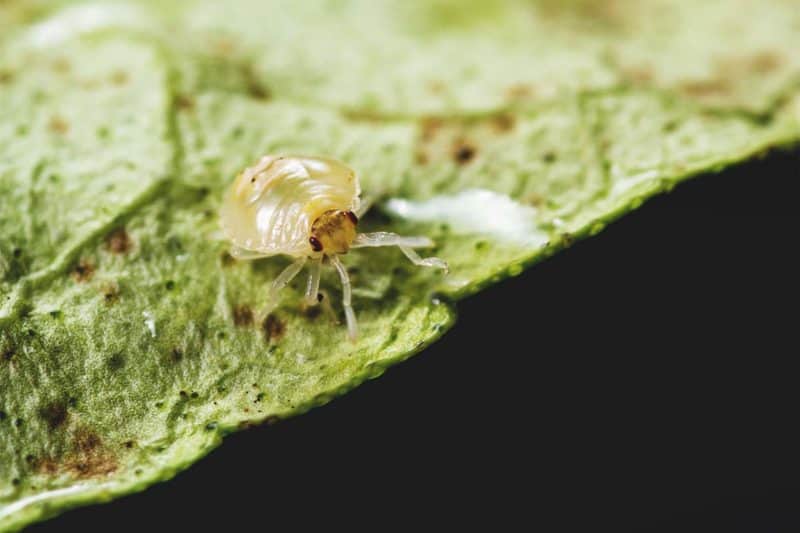
Managing Pests and Diseases in Your Onion Bed
To protect your onion plants, monitor for common pests such as onion maggots, thrips, and aphids. You can deter onion maggots by rotating crops yearly and using floating row covers. Introduce beneficial insects like ladybugs to combat aphids naturally. For thrips, consider applying insecticidal soap or neem oil.
Watch out for diseases such as downy mildew, pink root, and botrytis leaf blight. Ensure proper air circulation by spacing your plants adequately and avoid overwatering to reduce fungal risks. Remove and dispose of infected plant debris promptly. Using disease-resistant onion varieties can also improve outcomes. Regular inspections are key—act quickly when you spot issues.
Caring for Onions Through the Growing Season
To keep your onions healthy, ensure they get 1 inch of water weekly, either from rainfall or manual watering. Moisture should be consistent but avoid overwatering, which can encourage diseases. Regularly check for weeds; remove them carefully to avoid disturbing onion roots, which grow close to the surface.
Fertilize onions with nitrogen-rich fertilizer every two to three weeks to promote growth. Watch for signs of pests like thrips; use insecticidal soap if needed. As the onion tops turn yellow and bend over naturally, reduce watering. This signals the bulbs are nearing maturity and preparing for harvesting.
Harvesting Onions: When and How to Harvest
To determine if your onions are ready for harvest, observe the foliage. When the green tops start to yellow, weaken, and fall over, it’s a sign that the bulbs have matured. Avoid harvesting too early to ensure full bulb development.

When harvesting:
- Gently loosen the soil around the bulbs with a garden fork or trowel.
- Pull the onions from the soil, taking care not to bruise them.
- Lay them out in a single layer in a sunny, dry spot for curing. Leave them for about two weeks until the outer skin becomes papery.
Proper curing extends their storage life significantly.
Storing Onions: Tips for Prolonging Their Shelf Life
To maximize the shelf life of harvested onions, store them properly to prevent spoilage. First, cure your onions by placing them in a warm, dry, and well-ventilated area for two to four weeks. Once cured, remove dirt and trim any excess roots and tops. Avoid washing them to ensure they stay dry.
Store onions in a cool, dark place with good airflow, such as a basement, pantry, or garage. Keep them in mesh bags, baskets, or pantyhose to maintain ventilation. Avoid refrigerating whole onions, as excess moisture can cause spoilage. Check them regularly for signs of decay.
Common Mistakes to Avoid When Growing Onions
- Planting Too Deeply: Onions need shallow planting to thrive. If you bury them too deeply, their growth might be stunted, and bulbs won’t form properly. Aim to plant sets or seedlings with only the roots beneath the soil.
- Overwatering: Overwatering can lead to rot and diseases. Onions require well-draining soil and consistent moisture but avoid keeping the soil soggy. Check regularly to ensure proper water balance.
- Ignoring Spacing: Crowding onions prevents bulbs from expanding fully. Space them 4-6 inches apart to allow adequate room for growth and airflow, reducing the chances of fungal issues.
- Skipping Weeding: Onions compete with weeds for nutrients and sunlight. Regularly remove weeds to maximize their development and avoid choking plants.
- Using Poor Soil: Onions need nutrient-rich, loose soil. Poorly prepared soil can lead to small or deformed bulbs. Add compost or organic matter to ensure proper growth.
Conclusion: Enjoying Your Fresh, Homegrown Onions
Harvesting the onions you’ve nurtured in your raised garden bed is a rewarding experience. Once the tops begin to fall over and turn yellow, it’s time to gently pull them from the soil. Let them cure in a dry, ventilated area to preserve their flavor and longevity. You can then store them in a cool, dark place for months of use. These homegrown onions add a fresh, crisp flavor to your dishes. Their vibrant taste will enhance your meals, making your gardening efforts worthwhile. Relish the satisfaction of cooking with produce grown by your own hands!