The adenium plant, commonly known as desert rose (Adenium obesum), is a stunning succulent prized for its vibrant, trumpet-shaped flowers and thick, sculptural stems. Native to arid regions of Africa and the Middle East, this plant is a favorite for its exotic beauty and relatively easy care. Repotting an adenium plant is essential to maintain its health, encourage growth, and showcase its unique form. Whether you’re refreshing the soil or accommodating a growing plant, this guide will walk you through every step to successfully repot your adenium plant.
Why Repot an Adenium Plant?
Repotting is crucial for adeniums to prevent root-bound conditions, refresh nutrient-depleted soil, and improve drainage. Adeniums thrive in well-draining environments, and repotting ensures their roots have space to grow and access fresh nutrients. Repotting is typically needed every 1–2 years or when the plant outgrows its pot. It’s also an opportunity to inspect roots for health and enhance the plant’s aesthetic appeal, especially for bonsai-style displays. This process is ideal for gardeners in USDA zones 10–11 or those growing adeniums indoors in cooler climates.
Step-by-Step Guide to Repotting an Adenium Plant
1. Choose the Right Time
- Timing: Repot in spring or early summer, during the active growing season, when the plant can recover quickly. Avoid repotting during dormancy (fall/winter) to minimize stress.
- Signs It’s Time to Repot:
- Roots are circling the pot or emerging from drainage holes.
- Soil dries out too quickly or retains too much water.
- The plant looks top-heavy or growth has slowed.
- Frequency: Repot young adeniums annually; mature plants every 2–3 years.
2. Select the Right Pot
- Size: Choose a pot 1–2 inches wider and deeper than the current one to allow root growth without excess soil retaining moisture. For bonsai-style adeniums, use shallow, wide pots to showcase the thickened caudex (swollen stem base).
- Material: Terracotta or unglazed ceramic pots are ideal for their breathability, which helps prevent overwatering. Plastic pots work but require careful watering.
- Drainage: Ensure the pot has multiple drainage holes to prevent water accumulation, critical for adenium health.
3. Prepare the Potting Media
- Soil Type: Use a well-draining mix suited for succulents or cacti. A recommended mix is:
- 50% cactus/succulent potting soil.
- 25% perlite or pumice (for drainage and aeration).
- 25% coarse sand or crushed gravel (for structure).
- Commercial Mixes: Opt for brands like Miracle-Gro Cactus, Palm & Citrus Mix, amending with extra perlite if it feels too dense.
- Sterilization (Optional): Bake homemade mix at 180°F for 30 minutes to kill pathogens, especially for indoor plants.
- pH Level: Aim for a slightly acidic to neutral pH (5.5–7.0). Test with a soil kit and adjust with lime (to raise pH) or sulfur (to lower pH) if needed.
4. Gather Supplies
- Tools: Clean, sharp pruning shears, gloves (adenium sap is toxic), a trowel, and a soft brush for cleaning roots.
- Other Materials: Newspaper or a tarp for mess control, a new pot, and fresh potting mix.
- Safety Note: Wear gloves when handling adeniums, as their sap can irritate skin and is toxic if ingested. Keep away from pets and children.
5. Remove the Adenium from Its Current Pot
- Preparation: Water the plant lightly 1–2 days before repotting to ease removal and reduce root stress.
- Removal:
- Lay the plant on its side and gently tap the pot to loosen the soil.
- Carefully slide the plant out, supporting the caudex to avoid damage.
- If stuck, run a knife around the pot’s inner edge to loosen the root ball.
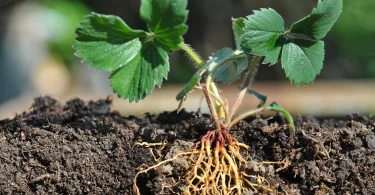
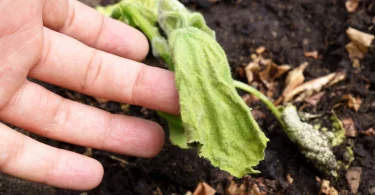
- Root Inspection: Gently shake off old soil and inspect roots for rot (soft, black, or mushy roots). Trim unhealthy roots with clean shears, leaving healthy, firm roots intact.
6. Repot the Adenium
- Prepare the New Pot:
- Add a 1-inch layer of gravel or broken pottery at the bottom for extra drainage.
- Fill the pot one-third with the prepared succulent mix.
- Positioning the Plant:
- Place the adenium in the center, adjusting the height to showcase the caudex. For bonsai displays, elevate the caudex slightly above soil level to highlight its shape.
- Spread roots gently to encourage outward growth.
- Filling the Pot: Add more mix around the roots, filling to within ½ inch of the rim. Press lightly to secure the plant without compacting the soil.
- Top Dressing (Optional): Add a thin layer of decorative gravel or pebbles for aesthetics and to reduce soil erosion during watering.
- Watering: Water lightly to settle the soil, then wait 5–7 days before watering again to allow the plant to adjust and prevent rot.
7. Care After Repotting
- Light: Place in bright, indirect light for 1–2 weeks to reduce stress, then transition to full sun (6–8 hours daily). Indoors, use a south-facing window or grow lights.
- Watering: Water sparingly for the first 2 weeks, then resume normal watering (when the top inch of soil is dry, typically every 1–2 weeks in spring/summer, every 3–4 weeks in fall/winter). Avoid overwatering.
- Fertilizing: Wait 4–6 weeks before fertilizing to avoid burning new roots. Use a diluted, low-nitrogen fertilizer (e.g., 5-10-10) every 4–6 weeks during the growing season.
- Temperature: Maintain 65–85°F. Protect from frost (below 50°F) in cooler climates.
- Pest Management: Monitor for mealybugs, spider mites, or scale. Treat with insecticidal soap or neem oil and ensure good air circulation.
8. Growing Adeniums Indoors
- Pot Selection: Use a terracotta or ceramic pot with drainage holes, 12–18 inches wide for mature plants.
- Care: Place in bright, indirect light or under grow lights. Water when the top inch of soil is dry, and maintain humidity with a pebble tray if air is dry. Keep temperatures above 50°F.
- Winter Care: Reduce watering during dormancy (fall/winter) and place in a cool, bright room (55–65°F).
9. Overwintering in Cooler Climates
- Zones 10–11: Mulch around the base in late fall to protect roots from light frosts. Prune frost-damaged growth in spring.
- Zones 5–9: Grow in containers and move indoors before the first frost. Place in a sunny window or under grow lights, watering sparingly during winter.
- Frost Protection: Cover outdoor plants with frost cloth during unexpected cold snaps in marginal zones.
Common Challenges and Solutions
- Root Rot: Caused by overwatering or poor drainage. Use a gritty, well-draining mix and water only when soil is dry. Remove affected roots and repot.
- Yellowing Leaves: Overwatering, insufficient light, or nutrient deficiency. Adjust watering, provide full sun, and apply a balanced fertilizer.
- Pests: Mealybugs, spider mites, or scale may appear. Treat with insecticidal soap or neem oil and isolate affected plants.
- Slow Growth: Compacted soil or lack of nutrients. Repot with fresh mix and fertilize during the growing season.
Tips for Success
- Bonsai Styling: Elevate the caudex during repotting to create a dramatic, tree-like appearance, perfect for bonsai enthusiasts.
- Pruning: Trim leggy stems or faded flowers after repotting to encourage bushier growth and more blooms. Prune in spring for best results.
- Container Gardening: Use adeniums in mixed succulent displays or as standalone specimens in decorative pots.
- Zone Considerations: In zones 5–9, grow indoors or in containers to protect from frost. In zones 10–11, they thrive outdoors year-round.
- Flowering Boost: Stress the plant slightly by reducing water in late summer to encourage vibrant blooms.
Fun Facts About Adenium Plants
- Desert Rose Name: The name reflects its ability to thrive in arid conditions and its rose-like flowers.
- Cultural Significance: In some cultures, adeniums symbolize resilience and beauty, often used in ornamental gardening.
- Toxic Sap: All parts are toxic if ingested, so handle with care and keep away from pets and children.
Troubleshooting Table
| Issue | Cause | Solution |
|---|---|---|
| Root rot | Overwatering or poor drainage | Use well-draining mix, water sparingly, remove affected roots and repot. |
| Yellowing leaves | Overwatering or low light | Reduce watering, ensure 6–8 hours of sun or use grow lights. |
| Pests | Mealybugs, spider mites, or scale | Treat with insecticidal soap or neem oil; improve air circulation. |
| No blooms | Insufficient light or nutrients | Provide full sun, use bloom-boosting fertilizer (e.g., 5-10-10). |
Conclusion
Repotting an adenium plant is a key step to ensure its vibrant growth and stunning blooms. By choosing the right pot, using well-draining soil, and providing proper care, you’ll keep your desert rose thriving for years. Whether you’re showcasing its sculptural caudex or enjoying its colorful flowers, repotting rejuvenates this exotic beauty. Start repotting this spring, and let your adenium shine in your home or garden!