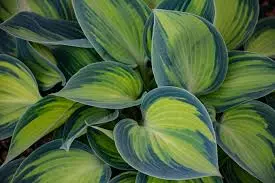
The African hosta (Drimiopsis maculata), also known as African false hosta, leopard plant, or little white soldiers, is a striking bulbous plant prized for its glossy, green foliage adorned with dark purple or green spots. Native to South Africa, this low-maintenance plant thrives in shaded areas, making it a fantastic addition to gardens or indoor spaces. Propagating African hostas is straightforward and rewarding, allowing you to expand your collection or share with fellow gardeners. In this guide, we’ll explore the best methods for African hosta propagation, along with care tips to ensure success.
Why Propagate African Hosta?
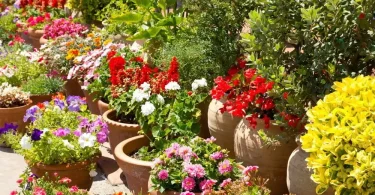
African hostas are a versatile choice for shaded gardens, rockeries, or as container plants. Their unique spotted leaves and delicate, bell-shaped flowers add ornamental charm to any space. Propagating African hostas allows you to:
- Expand your garden’s groundcover with minimal cost.
- Share plants with friends or fellow plant enthusiasts.
- Maintain plant health by dividing overcrowded clumps.
- Create lush, vibrant displays in new garden areas or pots.
Below, we’ll cover two primary propagation methods: division and seed propagation, along with tips for success.
Propagation Method 1: Division
Dividing established African hosta clumps is the easiest and most reliable way to propagate them. The plant’s bulbous nature makes it ideal for this method, as it naturally produces offsets that can be separated and replanted.
Steps for Propagation by Division
- Choose the Right Time:
The best time to divide African hostas is in early spring or fall, when the plant is not in active bloom. This minimizes stress and allows the divisions to establish before extreme weather. - Prepare Your Tools:
Use a clean, sharp trowel or garden knife to avoid damaging the bulbs. Sterilize tools with rubbing alcohol to prevent disease transmission. - Lift the Plant:
Carefully dig up the African hosta clump, starting a few inches away from the base to avoid cutting the bulbs. Gently shake off excess soil to expose the bulbs and roots. - Separate the Bulbs:
Identify natural divisions in the clump, ensuring each section has at least one bulb and some healthy roots. Gently pull apart the bulbs or use your tool to separate them. - Replant Divisions:
Replant the separated bulbs 3–4 inches apart in well-draining soil, ideally a mix of potting soil and compost (3:1 ratio) for optimal drainage and nutrients. Plant at the same depth they were growing previously, about 1–2 inches deep. - Water and Care:
Water sparingly after planting to settle the soil, then allow it to dry out almost completely between waterings. Place in a shady or partially shaded spot to mimic their natural habitat.
Tips for Success
- Spacing: For groundcover, plant divisions close together, as African hostas spread slowly.
- Soil: Use well-draining soil to prevent bulb rot. A mix with sand or perlite works well.
- Timing: If dividing in spring, wait until new growth appears. In fall, divide before the plant enters winter dormancy.
Propagation Method 2: Seeds
Propagating African hostas from seeds is less common but can be a fun project for patient gardeners. This method takes longer, as germination and growth are slower compared to division.
Steps for Propagation by Seeds
- Collect Seeds:
Harvest ripe seeds from mature African hosta plants after the flowering period (late spring to early summer). Look for seed pods formed after the creamy white, bell-shaped flowers fade. - Prepare the Soil:
Use a well-draining potting mix, such as a blend of potting soil, sand, and perlite. Fill small pots or seed trays with the mix. - Sow the Seeds:
Lightly cover the seeds with a thin layer of soil (about 1/8 inch). Keep the soil consistently moist but not waterlogged. Place the pots in a warm area (70–75°F) with bright, indirect light. - Germination:
Seeds typically germinate within 14–30 days under optimal conditions. Be patient, as germination can be slow and inconsistent. - Care for Seedlings:
Once seedlings emerge, ensure they have vibrant green leaves and sturdy stems. Thin out weaker seedlings to prevent overcrowding. Transplant to individual pots or the garden when they develop 2–3 true leaves. - Transplanting:
Move seedlings to their permanent location in shade or partial shade, maintaining the same care as mature plants. Water sparingly and ensure good drainage.
Tips for Success
- Temperature: Maintain a consistent 70–75°F for best germination results.
- Patience: Seed propagation is slower than division, so expect mature plants in 1–2 years.
- Moisture: Keep the soil moist but not soggy to avoid fungal issues.
Care Tips for Newly Propagated African Hostas
Whether you propagate by division or seeds, proper care ensures your new plants thrive:
- Light: African hostas prefer shade or partial shade. Too much sun can scorch leaves, while deep shade enhances their spotted foliage.
- Watering: Water sparingly, allowing the soil to dry out between waterings. Overwatering can cause bulb rot.
- Fertilizer: Apply a balanced fertilizer (e.g., 10-10-10 N-P-K) lightly in early spring. African hostas are not heavy feeders and can thrive without much fertilization.
- Pests: Watch for shade-loving pests like slugs or snails, which may damage leaves. Remove debris around plants to deter pests.
- Winter Care: In colder climates (below USDA Zone 8), bring container plants indoors or mulch heavily to protect bulbs during winter dormancy.
Common Challenges and Solutions
- Slow Growth: African hostas grow slowly, especially from seeds. Be patient and ensure proper light and soil conditions.
- Bulb Rot: Overwatering is a common issue. Use well-draining soil and water only when the top inch of soil is dry.
- Pest Damage: Slugs and snails love shaded areas. Use organic slug bait or create barriers with crushed eggshells.
Why African Hosta Propagation is Worth It
Propagating African hostas is a rewarding way to enhance your garden with minimal effort. Their drought tolerance, low maintenance, and striking foliage make them a standout choice for shaded areas or containers. Whether you’re dividing bulbs to create lush groundcover or experimenting with seeds for a new challenge, African hostas bring unique beauty to any space.
Start propagating today and enjoy the lush, spotted foliage of African hostas in your garden! For more gardening tips or to explore companion plants like ferns or true hostas, check out our other blog posts. Happy gardening!