Introduction to Growing Tomatoes from Seeds
Grow your tomato plants from seeds allows you to explore a wider variety of tomato types and ensures a rewarding gardening experience. You’ll need a few essential supplies, including quality tomato seeds, seed trays, potting soil, and grow lights or access to natural sunlight. It’s important to begin the process indoors about six to eight weeks before the last frost date in your area. This gives the seeds ample time to germinate and grow into sturdy seedlings ready for transplanting.

Proper care during the early stages is crucial. Ensure consistent soil moisture, adequate light exposure, and a warm environment to encourage healthy growth of your seedlings.
Benefits of Growing Tomatoes from Seeds Instead of Buying Plants
- Cost-Effectiveness: When you grow tomatoes from seeds, you save money compared to buying established plants. Seed packets often contain dozens of seeds for the price of one plant.
- Greater Variety: Growing from seeds gives you access to a wider range of tomato types, including unique heirloom varieties that may not be available at local nurseries.
- Healthier Growth: Tomatoes grown from seeds adapt better to your soil and environment, leading to sturdier plants. They can develop stronger roots and be less prone to transplant shock.
- Season Control: Starting seeds indoors lets you control the timing of your growing season, ensuring plants reach maturity at the ideal time.
- Personal Satisfaction: You gain the satisfaction of nurturing plants from the very beginning, observing their lifecycle, and harvesting the fruits of your labor.
Choosing the Right Tomato Varieties for Your Garden
When selecting tomato varieties, consider the growing conditions and your desired harvest. Determine whether you prefer determinate or indeterminate tomatoes. Determinate varieties grow to a set height and produce fruit all at once, ideal for limited spaces or canning. Indeterminate varieties keep growing and fruiting throughout the season, making them perfect for fresh consumption.

Think about the climate in your area. Regions with shorter growing seasons benefit from early-maturing tomatoes like Stupice or Glacier, while warm climates support longer-season types like Beefsteak or Brandywine. Also, consider specialties like cherry tomatoes for snacking or paste tomatoes for cooking. Research disease-resistant options to ensure healthier plants.
Essential Tools and Materials Needed to Get Started
To start growing tomatoes from seeds, you’ll need several tools and materials to make the process easier and more efficient. Below is a list to guide you:
Tools
- Starter trays or small pots: Perfect for sowing seeds and fostering initial growth.
- Plant labels: Help keep track of different tomato varieties.
- Spray bottle: Provides a gentle way to water without disturbing the seeds.
- Garden trowel: Useful for transplanting seedlings.
Materials
- Tomato seeds: Choose varieties based on your preferences for growth and taste.
- Seedling mix: Ensure loose, well-draining soil to promote root development.
- Grow lights: Supplement natural light for healthy seedlings.
- Liquid fertilizer: Supports early nutrition for strong roots and shoots.

Step-by-Step Guide to Starting Tomato Seeds Indoors
- Choose Your Seeds and Containers Select tomato varieties suited for your growing zone. Use seed trays, peat pots, or small containers with drainage holes to plant your seeds.
- Prepare Your Seed-Starting Soil Fill your containers with a light, well-draining seed-starting mix. Avoid regular garden soil, as it may compact and impede growth.
- Plant the Seeds Sow seeds about 1/4 inch deep. Place 2-3 seeds per container to ensure successful germination, later thinning out weaker seedlings.
- Water Your Seeds Water gently to moisten the soil. Avoid overwatering, which can lead to rot.
- Provide Warmth Maintain a soil temperature of 70-80°F by placing the trays near a heat source or using a heat mat.
- Ensure Adequate Lighting Place the containers in a bright spot or under grow lights for 14-16 hours daily. Watch for leggy seedlings, which indicate low light.
- Monitor Growth and Thin Seedlings Once seedlings sprout, thin the weaker ones, leaving the strongest plant in each container for better growth.
- Transplant Seedlings When Ready Move seedlings to larger pots when they develop two sets of true leaves. Handle carefully to avoid damaging roots.
Understanding Germination and Creating the Ideal Environment
To germinate tomato seeds successfully, you need to provide warmth, moisture, and proper light. Begin by selecting high-quality seeds and ensure your planting medium is loose, well-draining, and rich in nutrients. Maintain temperatures between 70–80°F to trigger germination, as tomatoes thrive in warmth.
Use seed trays or small containers filled with soil and sow seeds about ¼-inch deep. Mist the soil lightly to keep it moist but not soggy.

Place containers in a sunny location or use grow lights to provide consistent light. Keep humidity levels high by covering them with plastic wrap or a domed lid until sprouts appear, typically within 5–10 days.
Transplanting Seedlings: When and How to Do It Correctly
Transplanting tomato seedlings is a critical step for healthy plant development. You should transplant when seedlings have 2 to 4 true leaves and are roughly 3 to 4 inches tall.
Steps to Transplant Properly:
- Prepare new pots or garden soil: Use nutrient-rich, well-draining soil.
- Choose the right time: Aim for a late afternoon or cloudy day to reduce transplant shock.
- Loosen the soil: Gently remove seedlings by loosening the surrounding soil.
- Plant deep: Bury the stem up to the first set of true leaves for stronger root growth.
- Water immediately: Thoroughly water to settle the soil and hydrate the plant.
Monitor seedlings for a few days post-transplant to spot any signs of stress.
Caring for Tomato Plants in Their Early Growth Stages
When your tomato seedlings begin to emerge, provide consistent moisture by watering them gently. Aim to keep the soil evenly moist but not waterlogged. Place the seedlings in a location that gets abundant sunlight—ideally, 12-16 hours daily—and maintain a temperature of 65-75°F to prevent stunted growth. Thin the seedlings if necessary, leaving the healthiest ones to avoid overcrowding.

Use a balanced, diluted fertilizer once a week to give your plants essential nutrients for strong development. As they grow taller, gently stake them or use small supports to keep them upright. Inspect for signs of pests or diseases early to address any issues quickly.
Hardening Off: Transitioning Your Seedlings to the Outdoors
Hardening off is a critical process to prepare your tomato seedlings for life outside. Gradually acclimate them to external conditions over 7–10 days to avoid transplant shock. Start by placing the seedlings outdoors in a shaded location for 1–2 hours, gradually increasing exposure to sunlight and wind each day. Keep the seedlings protected from strong winds, heavy rain, or sudden temperature drops during this phase. Ensure they remain well-watered but avoid overwatering. By the end of the hardening off period, your seedlings should tolerate full sun and varying temperatures, making them ready for planting into your garden soil.
Selecting the Ideal Location for Tomato Plants in Your Garden
When choosing the location for your tomato plants, focus on areas with full sun exposure. Tomato plants need at least 6–8 hours of direct sunlight daily to thrive. Select well-draining soil to prevent waterlogging, which can lead to root rot. Look for a spot sheltered from strong winds that could damage the plants or obstruct pollination.
Evaluate the soil’s pH, aiming for a slightly acidic range of 6.0–7.0. If possible, rotate planting locations each year to avoid soil-borne diseases. Ensure easy access to water for consistent irrigation. Avoid low-lying areas where cold air or frost could settle and harm your plants.
Planting Tomatoes Outdoors: Soil Preparation and Spacing
To ensure healthy tomato growth, begin by choosing well-draining, nutrient-rich soil. Test your soil’s pH level; it should ideally range between 6.0 and 6.8 for optimal plant performance. Work organic matter, such as compost, into the soil to improve fertility and texture. Remove weeds or debris from the planting site to avoid competition for nutrients.

When spacing, allow 18 to 24 inches between plants within rows to facilitate airflow and prevent overcrowding. Space rows at least 36 inches apart to accommodate growth and maintenance. Staking or caging will help support plants as they mature and produce fruit.
Watering, Fertilizing, and Maintaining Healthy Plants
Water your tomato plants consistently to keep the soil evenly moist but not waterlogged. Use a deep soaking method to encourage strong root growth. Early in the morning or late afternoon is ideal to reduce evaporation.
Fertilize with a balanced fertilizer during key growth stages. Apply a nitrogen-rich fertilizer early on, switching to one with more phosphorus and potassium as flowers and fruits develop. Always follow package instructions to avoid over-fertilizing.
Prune suckers—the small shoots growing between main stems—to focus energy on fruit production. Regularly check for pests like aphids or fungal issues such as blight. Mulch around the plants to retain moisture and suppress weeds.
Dealing with Common Tomato Plant Pests and Diseases
Tomato plants are susceptible to pests and diseases, so knowing how to manage them is crucial. To combat pests like aphids, whiteflies, and hornworms, you can use insecticidal soap or introduce beneficial insects such as ladybugs. Regularly inspect your plants for signs of infestation, like holes in leaves or yellowing. Diseases like blight and wilt often emerge due to poor soil drainage or overly wet foliage. You can prevent these by watering at the base, ensuring proper air circulation, and removing infected leaves promptly. Always rotate your crops each year to reduce soilborne diseases and improve plant health.

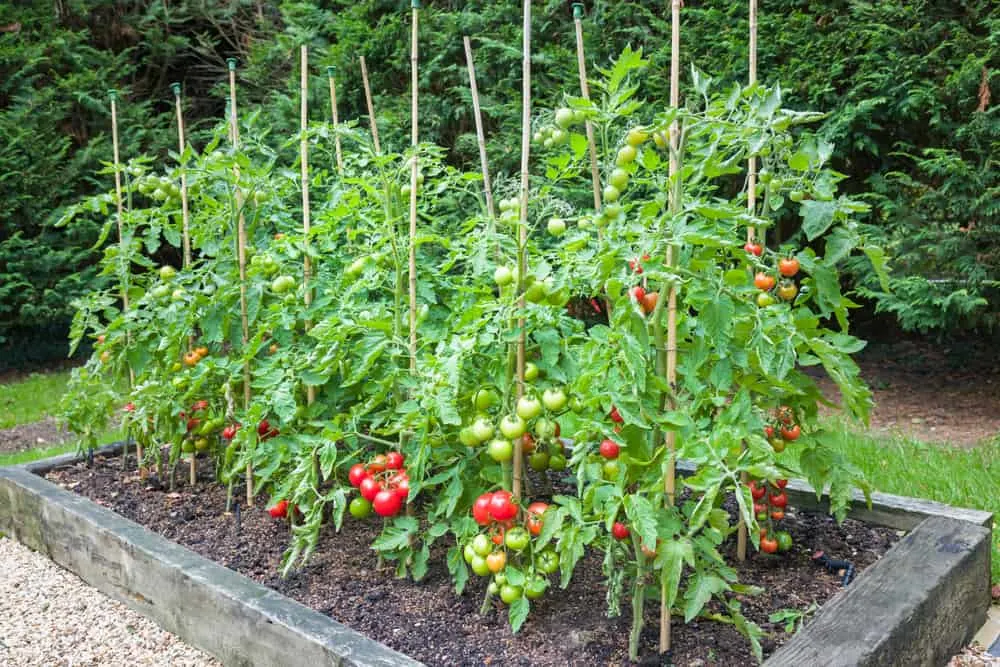
Staking, Caging, and Supporting Your Tomato Plants
Tomato plants need proper support to thrive and produce healthy fruit. You can choose from various methods like staking, caging, or trellising.
- Staking: Drive a wooden, bamboo, or metal stake into the ground near each plant. Use soft ties to secure the plant to the stake as it grows. This method is efficient for small spaces and helps keep the plant upright.
- Caging: Tomato cages, made of wire or mesh, encircle the plant and allow natural growth without binding. Install cages early to avoid damaging roots later.
- Trellising: For larger areas, construct a trellis and train your tomatoes to climb. This provides robust support and maximizes sunlight exposure.
Harvesting: How to Know When Your Tomatoes Are Ripe
To determine if your tomatoes are ready for harvesting, observe their color. Depending on the variety, ripe tomatoes usually transform into vibrant shades of red, orange, yellow, or even purple. Feel the fruit gently; ripe tomatoes are firm yet slightly soft to the touch.
Smell can also provide clues, as ripe tomatoes emit a sweet, earthy aroma. Check the vine connection—ripe tomatoes will detach easily with a light twist. Avoid waiting too long to harvest, as overripening may result in splitting or reduced quality. These cues ensure your tomatoes are picked at their peak freshness.

Storing and Preserving Freshly Harvested Tomatoes
To keep your harvested tomatoes fresh and flavorful, avoid refrigerating them immediately as cold temperatures can diminish their taste and texture. Instead, store ripe tomatoes at room temperature, ideally away from direct sunlight. If they are slightly underripe, place them in a paper bag to speed up ripening.
When preserving tomatoes for long-term use, you can choose from several methods:
- Freezing: Freeze whole, chopped, or pureed tomatoes. Wash, core, and bag them securely to preserve their quality.
- Canning: Safely can fresh tomatoes by boiling or pressure-cooking them. Add lemon juice for acidity.
- Drying: Slice tomatoes thinly and use a dehydrator or oven to create sun-dried tomatoes.
Ensure all preservation tools are sanitized to prevent contamination.
Troubleshooting Tips for Common Beginner Mistakes
- Overwatering or Underwatering Check the soil regularly; it should feel moist but not waterlogged. If leaves turn yellow, you may be overwatering. Drooping leaves might indicate underwatering.
- Leggy Seedlings If your seedlings grow tall and spindly, increase light exposure. Place them under grow lights or near a sunny window to promote sturdy growth.
- Damping-Off Disease Prevent fungal issues by using sterilized potting soil and ensuring good ventilation. Water seedlings at the base, not over the leaves.
- Slow Germination Make sure the soil temperature is between 70–85°F. If seeds don’t sprout, recheck moisture and temperature levels.
- Nutrient Deficiencies Yellowing leaves may signal a lack of nutrients. Use a diluted liquid fertilizer to provide essential minerals. Monitor progress after application.
Conclusion and Encouragement for First-Time Growers
Growing tomatoes from seeds is a rewarding journey that allows you to witness the entire life cycle of a plant. As a first-time grower, you might face challenges, but each step teaches you something valuable about gardening. Pay close attention to watering, light, and soil conditions, as these are essential for healthy plants.
Stay patient and consistent, as tomato plants need time to establish themselves. If mistakes happen, view them as learning opportunities rather than setbacks. With practice and care, you’ll grow confident in your skills. Remember, every gardener starts somewhere, and your dedication will lead to a flourishing harvest. Keep going—you’ve got this!