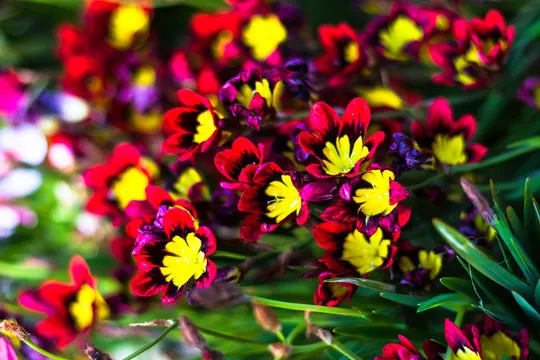
Sparaxis, commonly known as harlequin flowers or wandflowers, are vibrant, low-growing bulbs that bring a burst of color to any garden. Native to South Africa, these spring-blooming plants are prized for their star-shaped flowers in shades of red, pink, white, yellow, and orange, often with striking contrasting centers. Grow sparaxis from bulbs is straightforward, making them an excellent choice for both novice and experienced gardeners. This detailed guide will walk you through every step to successfully cultivate sparaxis in your garden.
Why Grow Sparaxis from Bulbs?
Sparaxis are perfect for adding a splash of color to rock gardens, borders, or containers. Their compact size (8–12 inches tall) and vivid blooms make them ideal for small spaces or mixed plantings. They thrive in warm climates (USDA zones 9–11) but can be grown in cooler zones with proper care. Sparaxis also attract pollinators like bees and butterflies, enhancing your garden’s ecosystem.
Step-by-Step Guide to Growing Sparaxis from Bulbs
1. Choose Quality Bulbs
- Quality Matters: Select firm, healthy sparaxis bulbs (corms) without signs of mold, softness, or damage. Larger corms (about 1 inch in diameter) typically produce stronger plants.
- Variety Selection: Popular varieties include Sparaxis tricolor (multicolored blooms) and Sparaxis grandiflora (larger flowers). Choose varieties based on your desired color palette.
- Timing: Purchase bulbs in late summer or early fall for fall planting in warm climates, or early spring for cooler regions.
2. Select the Perfect Location
- Sunlight: Sparaxis thrive in full sun, requiring at least 6–8 hours of direct sunlight daily for optimal blooming.
- Soil Type: They prefer well-draining, sandy, or loamy soil with a pH of 6.0–7.0. Avoid heavy clay soils, which can retain moisture and cause corm rot.
- Site Considerations: Choose a spot protected from strong winds to prevent damage to the delicate flower stems. Elevated or sloped areas improve drainage.
3. Prepare the Soil
- Loosen the Soil: Dig to a depth of 8–10 inches to ensure good root development and drainage.
- Amend the Soil: Mix in compost or well-rotted manure to enrich the soil. Adding sand or perlite can improve drainage in heavier soils.
- Test Drainage: After watering or rain, ensure water drains within a few hours. If it pools, consider raised beds or additional soil amendments.
- Soil Testing (Optional): Use a soil test kit to check pH and nutrient levels. Adjust with lime (to raise pH) or sulfur (to lower pH) if needed.
4. Plant the Bulbs
- Timing: In warm climates (zones 9–11), plant sparaxis bulbs in fall (September–November) for spring blooms. In cooler climates (zones 5–8), plant in early spring after the last frost, or pre-chill bulbs for 6–8 weeks in a refrigerator (40–45°F) before planting.
- Depth and Spacing: Plant bulbs 2–3 inches deep with the pointed end up. Space them 3–4 inches apart to allow for growth and air circulation.
- Planting Tip: Plant in groups of 10–15 for a bold, colorful display. Stagger planting for a natural, informal look.
- Watering: Water thoroughly after planting to settle the soil and encourage root growth.
5. Care for Your Sparaxis
- Watering: Keep the soil consistently moist but not waterlogged during the growing season (fall to spring in warm climates, spring to summer in cooler zones). Reduce watering after blooming as the foliage dies back.
- Fertilizing: Apply a balanced, low-nitrogen fertilizer (e.g., 5-10-10) at planting and again when shoots emerge in spring. Avoid high-nitrogen fertilizers, which promote foliage over flowers.
- Mulching: Add a 1–2 inch layer of organic mulch (e.g., bark or straw) to retain moisture and regulate soil temperature, especially in colder climates.
- Weed Control: Keep the planting area weed-free to reduce competition for nutrients and water.
6. Post-Bloom Care
- Deadheading: Remove faded flowers to prevent seed formation, which conserves energy for the corms. Leave the foliage to die back naturally.
- Foliage Care: Allow leaves to yellow and wither (about 6 weeks after blooming) to help the corms store energy for the next season.
- Storage (Cooler Climates): In zones 5–8, dig up corms after foliage dies back, dry them in a shaded, well-ventilated area, and store in a cool (50–60°F), dry place in mesh bags until replanting in spring.
- Leaving in Ground: In warm climates (zones 9–11), corms can remain in the ground year-round, but divide every 3–4 years to prevent overcrowding.
7. Growing Sparaxis in Containers
- Pot Selection: Use a pot with drainage holes, at least 6–8 inches deep.
- Soil Mix: Fill with a well-draining mix of potting soil, sand, and compost.
- Planting: Place bulbs 2 inches deep and 2–3 inches apart. Water lightly after planting.
- Care: Place the pot in full sun and water when the top inch of soil feels dry. Move indoors or to a sheltered area in colder climates during winter.
Common Challenges and Solutions
- Corm Rot: Overwatering or poor drainage can cause corms to rot. Ensure well-draining soil and avoid excessive watering. Discard any rotten corms.
- Pests: Aphids or spider mites may affect foliage. Use insecticidal soap or neem oil to control infestations.
- Sparse Blooms: Small or few blooms may result from overcrowding or nutrient deficiency. Divide corms every few years and fertilize appropriately.
- Frost Damage: In cooler climates, unexpected frosts can harm emerging shoots. Cover plants with frost cloth or move containers indoors during cold snaps.
Tips for Success
- Mass Planting: Plant sparaxis in clusters or drifts for a stunning visual impact. Mix colors for a vibrant display or use a single color for elegance.
- Companion Planting: Pair with other spring bulbs like tulips, daffodils, or freesias for a diverse, colorful garden.
- Naturalizing: In warm climates, sparaxis can naturalize, spreading gradually to create larger displays over time.
- Zone Considerations: In colder zones (5–8), treat sparaxis as annuals or lift and store corms to protect from freezing temperatures.
- Pollinator-Friendly: Sparaxis attract bees and butterflies, so plant them near vegetable gardens or fruit trees to boost pollination.
Fun Facts About Sparaxis
- Nickname Origin: The name “harlequin flower” comes from the vivid, contrasting colors of the blooms, resembling a harlequin’s costume.
- South African Native: Sparaxis are part of the Iridaceae family, closely related to irises and freesias, and thrive in Mediterranean-like climates.
- Symbolism: Sparaxis symbolize joy and celebration, making them a great addition to festive garden displays.
Troubleshooting Table
| Issue | Cause | Solution |
|---|---|---|
| No blooms | Insufficient sunlight or chilling | Ensure full sun; pre-chill bulbs in cooler zones for 6–8 weeks. |
| Small/weak blooms | Overcrowding or nutrient deficiency | Divide corms every 3–4 years; apply balanced fertilizer in spring. |
| Yellowing leaves | Overwatering or poor drainage | Reduce watering; improve drainage with sand or raised beds. |
| Pest damage | Aphids or spider mites | Use insecticidal soap or neem oil; inspect plants regularly. |
Conclusion
Growing sparaxis from bulbs is a rewarding way to add vibrant, long-lasting color to your garden. With their easy care requirements and stunning blooms, these harlequin flowers are perfect for beginners and seasoned gardeners alike. By selecting quality bulbs, preparing well-draining soil, and providing proper care, you’ll enjoy a spectacular spring display. Start planting this fall (or spring in cooler climates), and let sparaxis transform your garden into a colorful masterpiece!